Our next challenge is with Chimney Scissorsticks in the DMZ. He’s looking to defect and needs our help analyzing some data from Wombley’s drone army.
Silver
We can begin this challenge by opening the terminal and clicking on the hamburger menu in the top right. From here we can navigate to menu –> File Share and download fritjolf-Path.kml. KML files can be easily viewed in a variety of map programs but we’ll start with google earth. Opening the file gives us the below path around Antarctica.
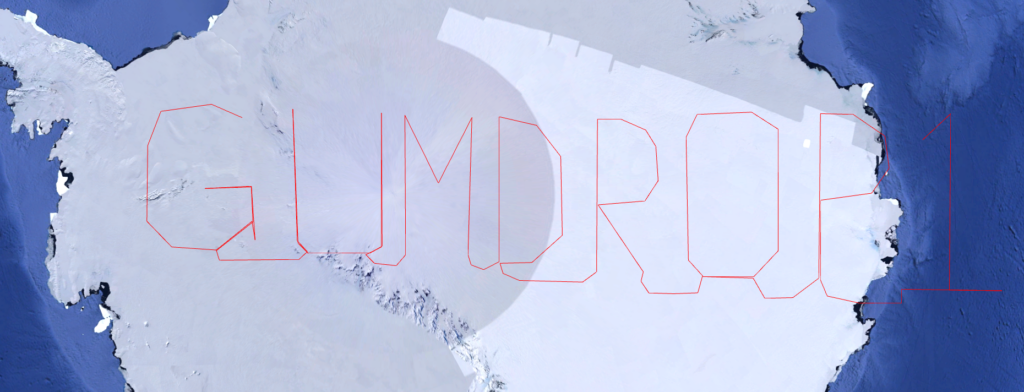
This spells out GUMDROP1 and combined with the file name fritjolf as the username we have our login credentials.

Logging in will bring us to a new page where we can search for a drone but for now we will go back to the menu and go to Profile. Here we have a link to a new file Preperations-drone-name.csv we can download this but before loading it into Google Earth we’ll want to convert it to kml and ensure that a flightpath is generated. This can be done with the below python script
import pandas as pd
import simplekml

# Load the CSV file
csv_file = 'Preparations-drone-name.csv'  # Path to your CSV file
df = pd.read_csv(csv_file, sep=',')  # Adjust separator if needed, assuming tab-separated

# Initialize KML object
kml = simplekml.Kml()

# Check if necessary columns exist
if 'OSD.latitude' in df.columns and 'OSD.longitude' in df.columns:
    # Create a list to hold the coordinates for the path
    coordinates = []

    for index, row in df.iterrows():
        # Add each point's coordinates to the list
        coordinates.append((row['OSD.longitude'], row['OSD.latitude']))

        # Create a KML point for each row
        kml.newpoint(
            name=row.get('CUSTOM.date [local]', 'Unknown'),
            coords=[(row['OSD.longitude'], row['OSD.latitude'])]
        )

    # Create a line connecting the dots
    linestring = kml.newlinestring(name="Flight Path")
    linestring.coords = coordinates
    linestring.style.linestyle.width = 3
    linestring.style.linestyle.color = simplekml.Color.red

    # Save the KML to a file
    kml.save("output2.kml")
    print("KML file with connected dots has been created!")

else:
    print("Error: Latitude and Longitude columns are missing.")
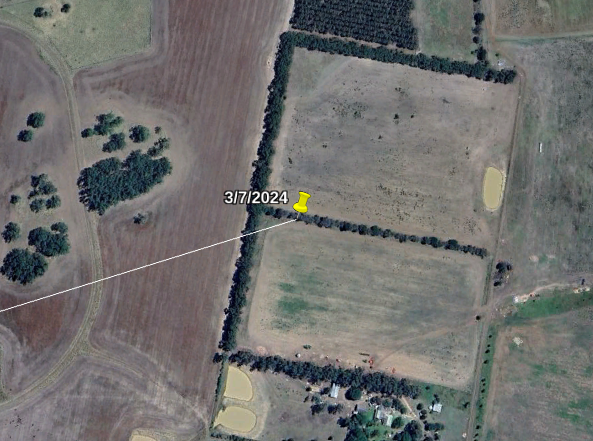
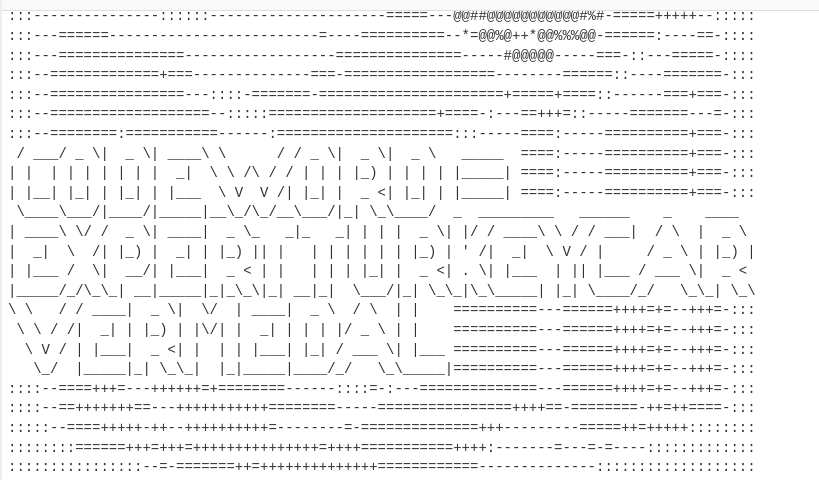
Loading the resulting file into Google Earth we’ll see a collection of 8 locations over Victoria, Australia. To solve this we can start from the point near Chintin and Darraweit Guim at the end of our line. Zooming in on this point we can see it’s in a very rural area however the geography near it appears to make a shape.
Following the line to all the points on the map we should see the rest of the letters to make ELF-HAWK. Entering this on the workshop page moves us to the next part of the challenge.
Next we can download this new CSV file. This is a massive amount of data and opening it in google earth leaves it looking like you can just barely make out the letters before it all falls apart but, 3d space is not the only way to view map data. If we instead use something like folium to convert and view the data then the image gets much clearer. The script and resulting image can be seen below
import pandas as pd
import folium

# Load CSV
csv_file = 'ELF-HAWK-dump.csv'
df = pd.read_csv(csv_file, sep=',')

# Initialize a map centered on a default point (or you can adjust to your data's center)
map_center = [df['OSD.latitude'].mean(), df['OSD.longitude'].mean()]
mymap = folium.Map(location=map_center, zoom_start=14)

# Initialize a list for flight path coordinates
flight_path_coordinates = []

# Iterate through rows and plot points only where both latitude and longitude are non-zero
for _, row in df.iterrows():
    latitude = float(row['OSD.latitude'])
    longitude = float(row['OSD.longitude'])

    # Plot point only if latitude and longitude are both non-zero
    if latitude != 0 and longitude != 0:
        # Add a marker for each valid point
        folium.Marker([latitude, longitude], popup=f"Time: {row.get('CUSTOM.date [local]', 'Unknown')}, Altitude: {row.get('OSD.height [ft]', 'N/A')} ft").add_to(mymap)
        flight_path_coordinates.append((latitude, longitude))

# Add the flight path as a polyline
if flight_path_coordinates:
    folium.PolyLine(flight_path_coordinates, color="blue", weight=2.5, opacity=1).add_to(mymap)

# Save map as an HTML file to view in the browser
mymap.save("flight_path_map.html")

print("Map has been saved as 'flight_path_map.html'. Open this file in a browser to view the map.")
The full text is DroneDataAnalystExpertMedal entering this into the Admin Console will unlock the silver medal.
Gold Medal
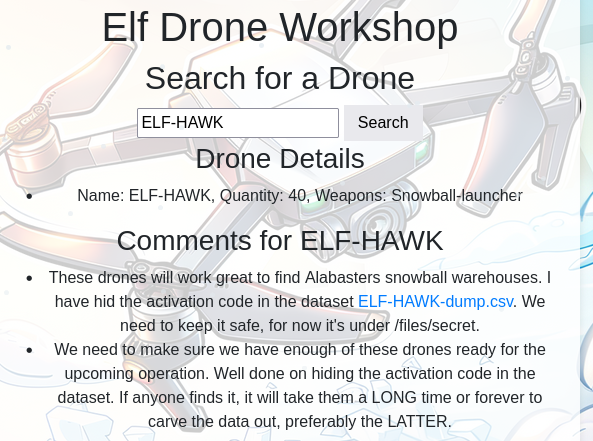
Talking to Chimney again he’ll provide some hints for our gold medal investigation, prompting us to check our file structures and that there’s a rumor of an injection flaw. I decided to start down the rabbit hole with that injection vulnerability. In the silver task we only saw a handful of prompts and the most likely one to be a SQL vuln was the Drone Name. On the workshop page entering Test' OR 1=1 -- grants us a dump of all the drones in the database.
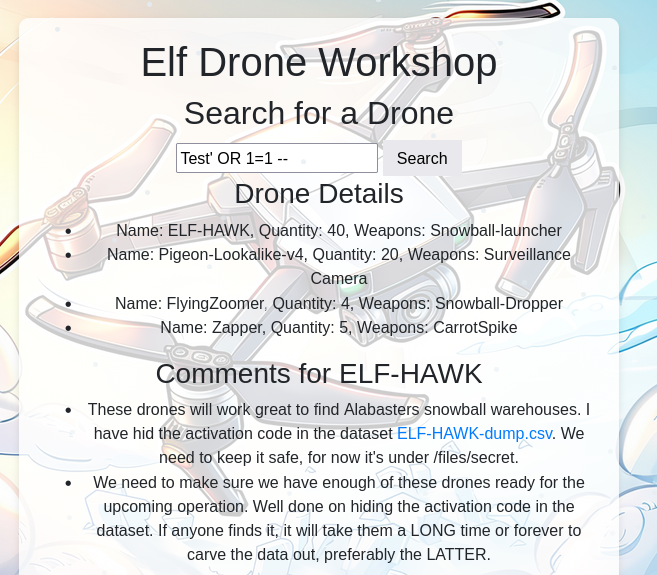
Doing a lookup of Pigeon-Lookalike-v4 grants us the hint.
I heard a rumor that there is something fishing with some of the files. There was some talk about only TRUE carvers would find secrets and that FALSE ones would never find it.
Looking over the CSV with the emphasis on True and False values immediately highlighted just how many there were to me. True and False can also be represented as 1 and 0 and a string of 1’s and 0’s is binary that could be converted to text to return our message. We can at around line 270 all the values turn to False. Knowing this the path forward should be to write a script that decodes the true and false to binary, eliminate the repeating 0 lines and then convert that binary to ASCII.
While this sounds like enough to start scripting and solve the challenge we are still missing the hint on the file structure. To solve this we need to look at the CSV header. All the way at the end we’ll see that there’s an extra row of data appended to the header. Using the Longitude and latitude to determine where in the file this belongs we can place it as the first row of data.
With this all in place we are ready to write and run our decryption script. This can be seen below
import csv

def process_csv(input_file, output_file):
    binary_string = ''

    # Open the CSV file for reading and the output file for writing
    with open(input_file, mode='r') as infile, open(output_file, mode='w') as outfile:
        reader = csv.reader(infile)
        rows = list(reader)

        # Process each row in the CSV
        for row in rows:
            # Build the binary string for the current row
            row_binary = ''.join(
                '1' if cell.lower() == 'true' else '0' if cell.lower() == 'false' else ''
                for cell in row
            )

            # Only append to binary_string if the row is not all zeros
            if '1' in row_binary:  # Check if there's at least one '1' in the row
                binary_string += row_binary

        # Print the long binary string to the console
        print(binary_string)

        # Write the long binary string to the output file
        outfile.write(binary_string + '\n')

# Example usage
input_csv = 'input.csv'  # Replace with your input CSV file
output_txt = 'output.txt'  # Replace with your desired output text file
process_csv(input_csv, output_txt)
This returns a very long binary string that we can place into CyberChef to return the answer of EXPERTTURKEYCARVERMEDAL
Entering this into the Admin Console grants us the gold medal
Leave a Reply